Cracking NTLM Hashes on Google Cloud's Nvidia Tesla T4 GPU

For my coursework for CMP506 Computer Security at Abertay University, I had to carry out a penetration test on a small company network. Besides basic enumeration and vulnerability scanning, we also had to apply various system hacking techniques, including password cracking of NTLM hashes. While in class, we’d primarily used Cain with dictionaries and rainbow tables (alphanumeric up 7 digits) for cracking, I also wanted to recover even more passwords by brute-forcing a larger candidate space. This post will talk about my experience of cracking the hashes on the Google Cloud both using John and hashcat. I will share how to set up hashcat on the Google Cloud.

Warning
This post is solely for educational purposes. Please use it only for educational purpose or in circumstances where you were previously authorized and password cracking was defined as part of the work scope.

First Failed Attempt: John the Ripper 🧛‍♂️

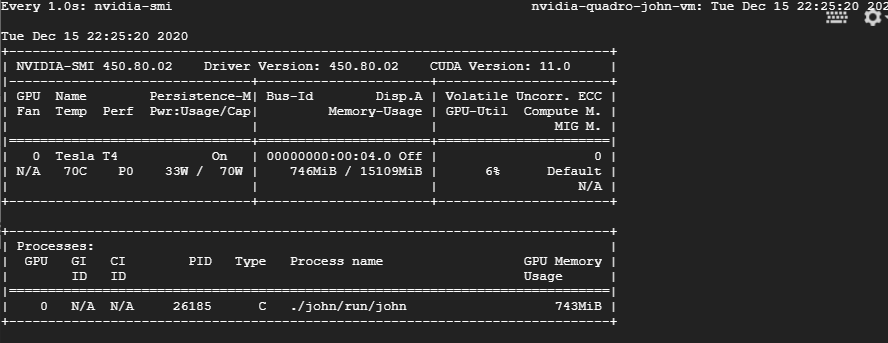
At first, I’d tried to crack the hashes using John, as it’s my go-to application for cracking and brute-forcing. While it was running faster on the Google Cloud than inside my VMware environment (no surprise!), I was still a bit disappointed by its overall speed. When I checked the resource monitor nvidia-smi, it became obvious that only six per cent of my rented GPU was utilized, while the CPU was running at full load.

GPU Utilization John The Ripper

After a little bit of research I found out that John creates the candidate passwords by the CPU, which makes the processor the actual bottleneck. So I could either scale up my CPU performance drastically or change to a GPU optimized cracker like hashcat. In light of my tight budget for this project, I went for the latter.

Second Successful Attempt: Hashcat 🐱‍

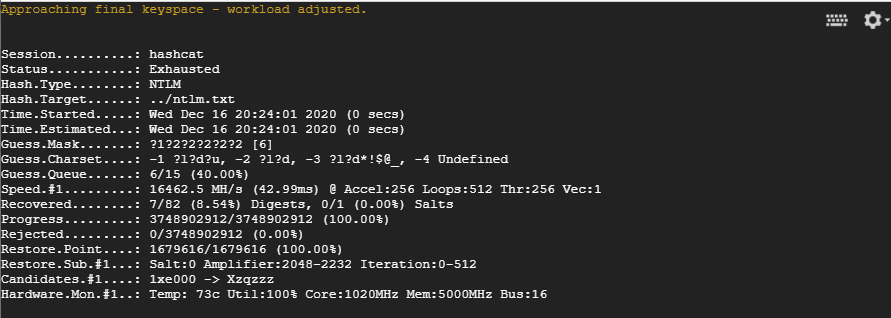
As a second attempt, I’d tried to use hashcat to crack my NTLM hashes, which I’d previously dumped using Meterpreter’s hashdump. With an average performance of around 16000 MH/s the speed was really good and allowed me to brute-force all passwords up to ten digits within seven days. With an average GPU utilization of 99 percent, I was also finally getting my money’s worth!

Hashcat running on Google Cloud

The overall performance could possibly even be improved by selecting a more potent setup and optimizing the driver and application. However, as the password cracking was only part of larger coursework, I didn’t want to invest more time and money.

Setting up Hashcat on Google Cloud Platform

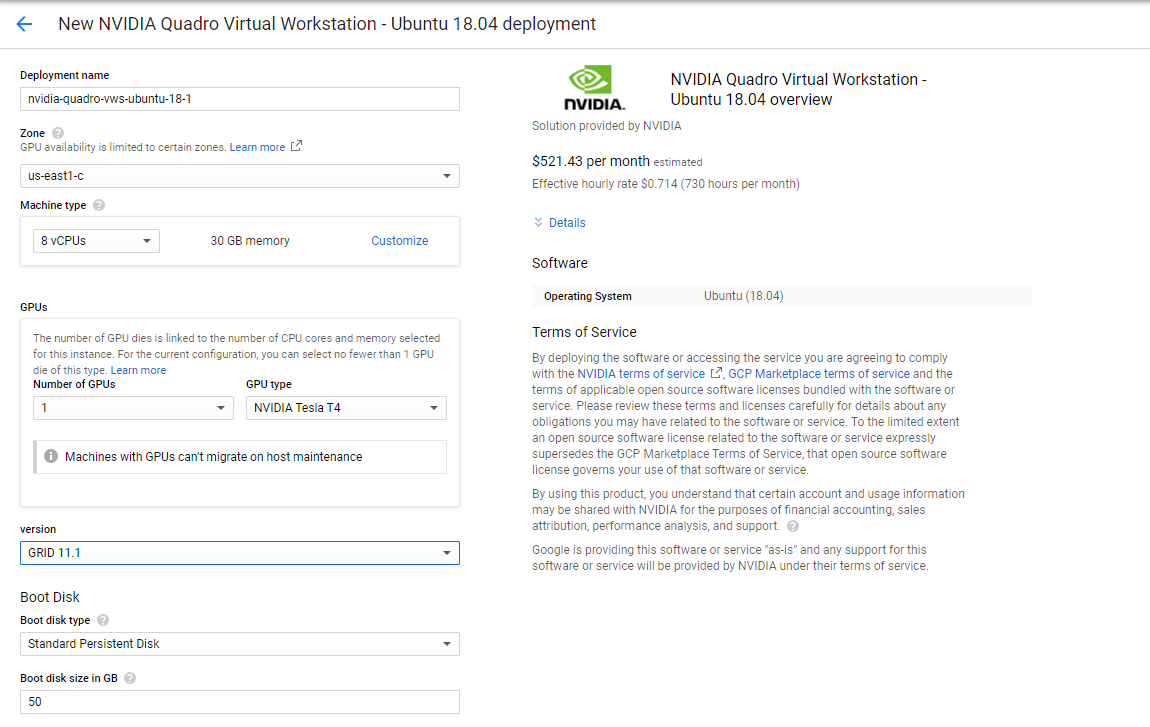
I started by configuring the instance through the web portal. I went for the NVIDIA Quadro virtual Workstation - Ubuntu 18.04 with 8 vCPUs, 30 GB of RAM and a single NVIDIA Tesla T4 for a monthly cost of slightly above $500. Please not that GPUs are billed by the minute and that you can not use them in conjunction with cheap Preemptible VM instances. Creating the instance on Google Cloud

Basic Checks

Once you are connected to the instance via SSH or through the browser shell, you can run the nvidia-smi tool, which should give you a nicely formatted overview of the GPU, its driver version and the utilization. By default, the GPU should idle.

1
$ nvidia-smi

Which gave me this output:

 1
 2
 3
 4
 5
 6
 7
 8
 9
10
11
12
13
14
15
16
17
18
19
20
Fri Jan 15 12:53:33 2021       
+-----------------------------------------------------------------------------+
| NVIDIA-SMI 450.80.02    Driver Version: 450.80.02    CUDA Version: 11.0     |
|-------------------------------+----------------------+----------------------+
| GPU  Name        Persistence-M| Bus-Id        Disp.A | Volatile Uncorr. ECC |
| Fan  Temp  Perf  Pwr:Usage/Cap|         Memory-Usage | GPU-Util  Compute M. |
|                               |                      |               MIG M. |
|===============================+======================+======================|
|   0  Tesla T4            On   | 00000000:00:04.0 Off |                    0 |
| N/A   47C    P8    16W /  70W |      0MiB / 15109MiB |      0%      Default |
|                               |                      |                  N/A |
+-------------------------------+----------------------+----------------------+
                                                                               
+-----------------------------------------------------------------------------+
| Processes:                                                                  |
|  GPU   GI   CI        PID   Type   Process name                  GPU Memory |
|        ID   ID                                                   Usage      |
|=============================================================================|
|  No running processes found                                                 |
+-----------------------------------------------------------------------------+

Tuning the GPU

At first, we enable the persistence mode of the GPU to keep the GPU initialized even when no client connects and therefore reduce the startup time. It’s also necessary to have persistence mode enabled to be able to change clock speeds of the GPU and the memory, which we’ll do right afterwards.

1
sudo nvidia-smi -pm ENABLED -i 0

Next, I could optimize application clocks. At first, I’d queried the available application clocks by running this simple query:

1
nvidia-smi  -q -i 0 -d SUPPORTED_CLOCKS

Which gave me a lengthy list, which I truncated for ease of reading. Basically, I could choose between two memory speeds in combination with various GPU clock speeds.

 1
 2
 3
 4
 5
 6
 7
 8
 9
10
11
12
13
14
15
16
17
18
==============NVSMI LOG==============

Timestamp                                 : Fri Jan 15 12:54:24 2021
Driver Version                            : 450.80.02
CUDA Version                              : 11.0

Attached GPUs                             : 1
GPU 00000000:00:04.0
    Supported Clocks
        Memory                            : 5001 MHz
            Graphics                      : 1590 MHz
            ...
  
        Memory                            : 405 MHz
            Graphics                      : 645 MHz
            Graphics                      : 630 MHz
            ...

Please note that the supported graphics clock rates are tied to a specific memory clock rate so when setting application clocks you must set both the memory clock and the graphics clock. In the above example, I could either go for the combination 5001,1590 or 405,645. Obviously, I went for the former.

1
sudo nvidia-smi -ac 5001,1590 -i 0

This should give you the following output:

1
2
Applications clocks set to "(MEM 5001, SM 1590)" for GPU 00000000:00:04.0
All done.

In case you want to reset the clock speeds to their defaults, simply run a sudo nvidia-smi -rac -i 0 command.

Installing Hashcat

We can download the latest precompiled binaries of Hashcat from their website using curl. When I’d tried this out, this was 5.1.0.

1
curl -OO https://hashcat.net/files/hashcat-5.1.0.7z{,.asc}
Info
At this point, it’s a good idea to verify the signing key using gpg –verify.

Once downloaded and verified, we got a legit copy, it’s time to unpack the Hashcat binaries using 7-Zip.

1
7z x hashcat-5.1.0.7z

The output should look like this:

 1
 2
 3
 4
 5
 6
 7
 8
 9
10
11
12
13
14
15
16
17
18
19
20
21
22
7-Zip [64] 16.02 : Copyright (c) 1999-2016 Igor Pavlov : 2016-05-21
p7zip Version 16.02 (locale=C.UTF-8,Utf16=on,HugeFiles=on,64 bits,8 CPUs Intel(R) Xeon(R) CPU @ 2.30GHz (306F0),ASM,AES-NI)

Scanning the drive for archives:
1 file, 2813043 bytes (2748 KiB)

Extracting archive: hashcat-5.1.0.7z
--
Path = hashcat-5.1.0.7z
Type = 7z
Physical Size = 2813043
Headers Size = 9051
Method = LZMA2:24m LZMA:20 BCJ2
Solid = +
Blocks = 2

Everything is Ok                              

Folders: 42
Files: 1012
Size:       24948865
Compressed: 2813043

Let’s crack some hashes!

For my coursework I had a list of 52 hashes in the following format, which were stored in a file named ntlm.txt:

1
2
3
4
5
6
7
Administrator:500:aad3b435b51404eeaad3b435b51404ee:e21be3c4d0977c59466a16de93d968f4:::
R.Astley:1110:aad3b435b51404eeaad3b435b51404ee:bde1966c31599bfafd3fea25f7f15ea2:::
S.Baldwin:1603:aad3b435b51404eeaad3b435b51404ee:d7207b7b0a39f7d4482abb3f0d233947:::
P.Henderson:1604:aad3b435b51404eeaad3b435b51404ee:8191807c4b4876fe416f2f177218f492:::
A.Sherman:1605:aad3b435b51404eeaad3b435b51404ee:8cda800b5ca1ffc8484d8579ccbb7838:::
T.Maldonado:1606:aad3b435b51404eeaad3b435b51404ee:cae11a207479bc7ed91b6df69d47cf70:::
...

To start Hashcat, simply change into hashcat-5.1.0 directory and run the executable like this:

1
2
3
cd hashcat-5.1.0/

./hashcat64.bin -m 1000 -a3 ../ntlm.txt --outfile=../ntlm_results.txt

Using parameters I’d set the type of the attack to brute-force attack (mode 3) and the hash mode to 1000 (NTLM). Additionally, I wanted to have my recovered passwords written to a separate text file, which I named ‘ntlm_results.txt’.

Info
Please not that this uses the guess mask of ?1?2?2?2?2?2?2?3?3 and a guess charset of -1 ?l?d?u, -2 ?l?d, -3 ?l?d*!$@_, -4 Undefined. This means that by default it only checks for capitalized letters at the beginning of the passwords and special characters at the end. While this can help to reduce the number of guesses, it might also miss some passwords such as yo6NijE. If you are trying to recover such randomized passwords, then you should adjust the guess mask.

After running Hashcat for a little while, I found the first passwords in my ntlm_results.txt:

1
2
3
4
5
c5a237b7e9d8e708d8436b6148a25fa1:test123
136bfda25371e387d143e096b60a2c69:shameful
d77348229ede4d12cbd523568f1967c8:cleavage
aff195181df8787e6084b879816c70ba:Ethiopia
e21be3c4d0977c59466a16de93d968f4:Hacklab1

Optimising Hashcat

When running with the default parameters, I averaged around 8600 MH/s which is good but not great. By appending -O (optimized kernel mode) and -w 3 (reduce writes to the console), I could drastically increase the speed to around 17000 MH/s.

 1
 2
 3
 4
 5
 6
 7
 8
 9
10
11
12
13
14
15
16
17
Session..........: hashcat
Status...........: Exhausted
Hash.Type........: NTLM
Hash.Target......: ../ntlm.txt
Time.Started.....: Fri Jan 15 13:53:24 2021 (8 secs)
Time.Estimated...: Fri Jan 15 13:53:32 2021 (0 secs)
Guess.Mask.......: ?1?2?2?2?2?2?2 [7]
Guess.Charset....: -1 ?l?d?u, -2 ?l?d, -3 ?l?d*!$@_, -4 Undefined 
Guess.Queue......: 7/15 (46.67%)
Speed.#1.........: 17511.0 MH/s (60.19ms) @ Accel:256 Loops:512 Thr:256 Vec:1
Recovered........: 5/82 (6.10%) Digests, 0/1 (0.00%) Salts
Progress.........: 134960504832/134960504832 (100.00%)
Rejected.........: 0/134960504832 (0.00%)
Restore.Point....: 60466176/60466176 (100.00%)
Restore.Sub.#1...: Salt:0 Amplifier:2048-2232 Iteration:0-512
Candidates.#1....: 1xvgawz -> Xzqzzzz
Hardware.Mon.#1..: Temp: 49c Util: 99% Core:1125MHz Mem:5000MHz Bus:16

Conclusion 🎇

This was a really fun little project, as it allowed me both to play around with Hashcat as well as use the Google Cloud Platform to solve my coursework. Even though I couldn’t recover all 52 passwords, I was at least able to find all passwords with up to 10 digits in a modest time. I hope this post is also useful for your own password cracking attempt.