Who's Watching You? Security Analysis of the LSC 1080P IP Camera From Action
Surveillance cameras are becoming an increasingly common sight in public and private spaces, with IP-based cameras being particularly popular due to their ability to transmit and store video footage over the internet. While these cameras can provide a sense of security and peace of mind, they can also be vulnerable to hacking. In this blog post, we will try to hack the LSC 1080 a popular Wifi camera sold by Action here in Germany and other European countries. The work on this camera was a joint effort together with my friend Michael Baurschmid.
Specifications
| |
Open Ports
The first step was to register the camera in the WIFI using the LSC app and perform a port scan via Nmap. At first, we struggled a bit, as the camera seems to be quite finicky in terms of supported frequency (read it supports only 2.4 GHz). A good old Windows 10 mobile hotspot came to the rescue and allowed us to move forward with our testing.
A scan across all TCP ports turned up the following:
| |
Dumping the Firmware
Our second step in getting a better understanding of the inner workings of the camera was dumping the firmware using a cheap CH341A programmer from Aliexpress. The camera uses an XMC XM25QH64AHIG as a persistent storage, which luckily is supported out of the box in the NeoProgrammer software we were using for reading the bytes from the memory chip. Reading the 32.768 memory pages took a few minutes and left us with a 1:1 copy of whatever was stored on the chip.
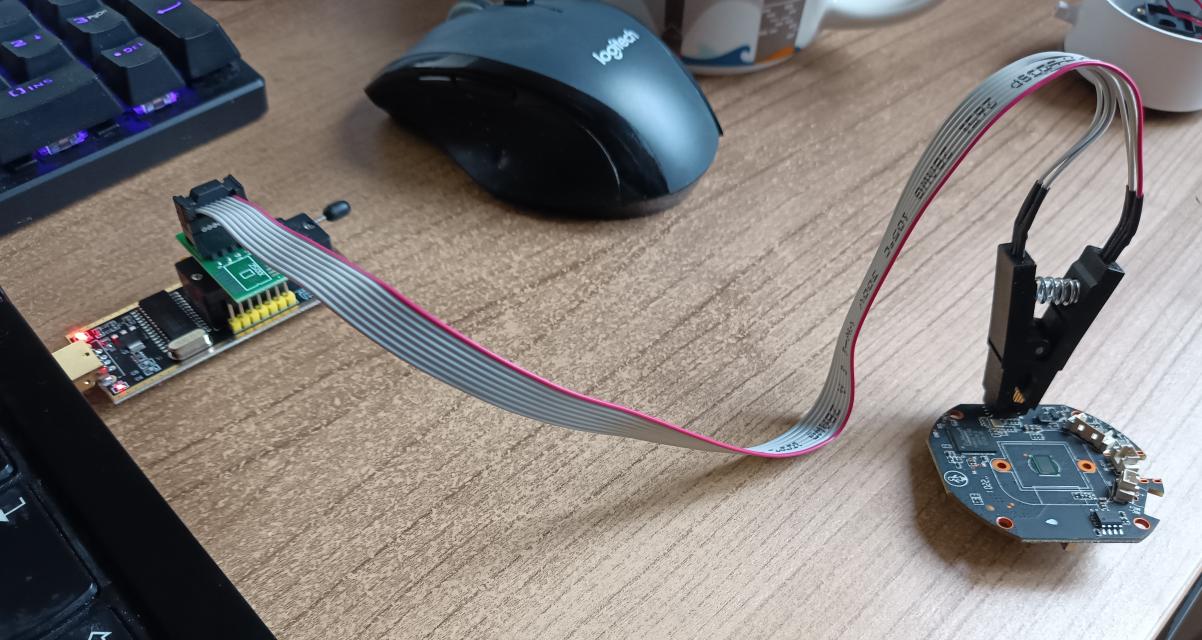
Dumping the firmware off the XM25QH64AHIG with a CH341A
To get to the guts of our LSC camera, we extracted the contents of the bin file using binwalk, which gave us the following output.
| |
As noticeable from the output, the camera uses both Squashfs and Jefferson filesystems.
A quick look around the file system revealed multiple files that will be of further interest for the remainder of the post, such as the /etc/passwd file, the dgiot application and the telnetd daemon.
The /etc/passwd
The analysis of the /etc/passwd file was a first for me, as it was the first time I actually saw a password hash that was stored within the passwd file and not the more common shadow file. Upon closer inspection, the password seemed to be encrypted using the DES algorithm. Due to the algorithm’s limited key lengths derived from 56 bits and susceptibility to brute-force attacks, the DES encryption should not be used anymore.
The entry discovered in the /etc/passwd file on the camera contained the following entry:
| |
Besides being encrypted with a weak algorithm, the camera is also sharing the same key to the kingdom with other popular IP cameras. A quick Google search showed that the password is indeed identical to the ones of the IOIODOG and La View cameras. A tip of the head goes to Mark, who documented the password dgiot010 as part of writing his thesis 1.
It is worth noticing that there were no other users present on the system
Enabling Telnet Remote Access
A quick look at the app_init.sh startup script unveiled that two primary applications get started during the boot process: the deamon and dgiot applications.
Based on our experience of working on similar IoT cameras we knew that often enough additional functionality, such as remote access can be enabled by creating a specific file on the SD card. Halfway through reverse engineering the two main system applications named deamon and dgiot and two fairly large .xz-files in Ghidra, we found the GitHub repo 2 of guino, who -like us- also scrutinized the camera in an effort to remove the cloud dependency and documented the steps for enabling remote access. In order to enable Telnet on the camera an ini-styled file named product.cof has to be created on a FAT32 formatted Micro SD with the following content:
| |
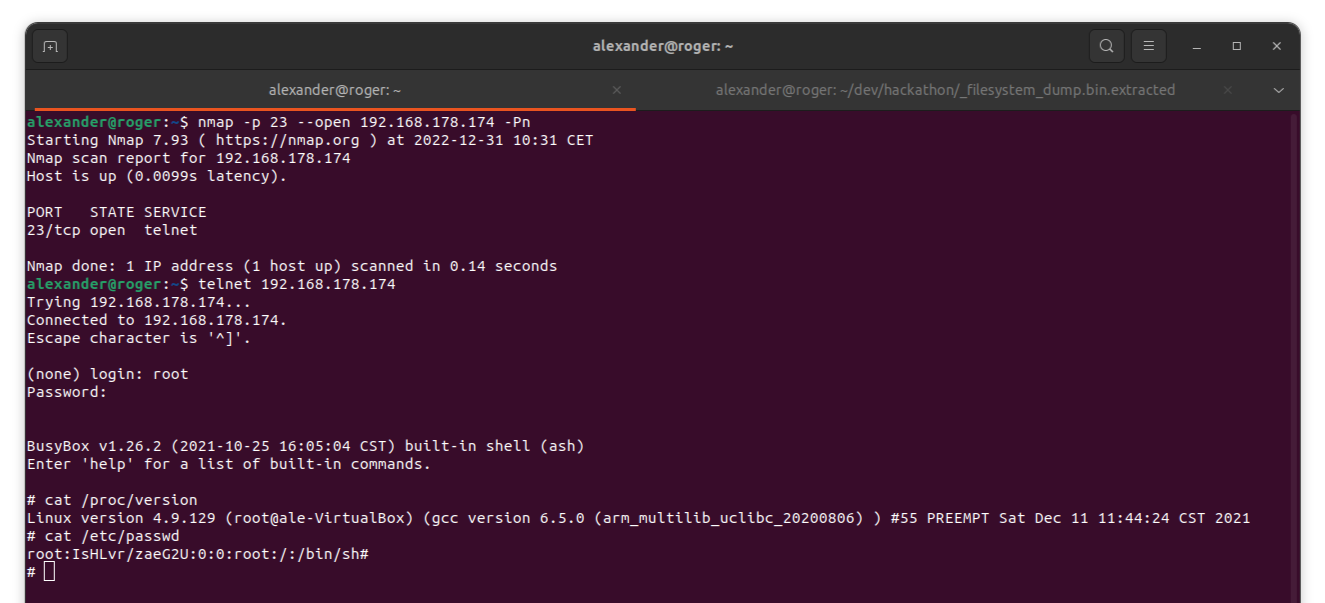
Once rebooted, we could log in using telnet and the previously recovered credentials (user: root, password: dgiot010).
| |
A Quick Look Around the System
Now that we had a shell, it was time to explore the device in action:
The cameras Linux kernel
The camera uses a quite dated Linux kernel from December 2016 last compiled in 2021.
Now let’s check active processes and open ports:
| |
We can see the applications running behind the open ports identified by the Nmap scans are the dgiot application and the in case of telnet, the telnetd daemon.
Reading Wifi PSKs through UART
We were able to connect to dev ports labeled RX and TX via the RS232 adapter, bought on AliExpress. At first glance, we want to try a script to figure out the correct baud rate but after a brief discussion, we tried the rates 9600 and 115200. The winner was 115200 and we were off to the moon.
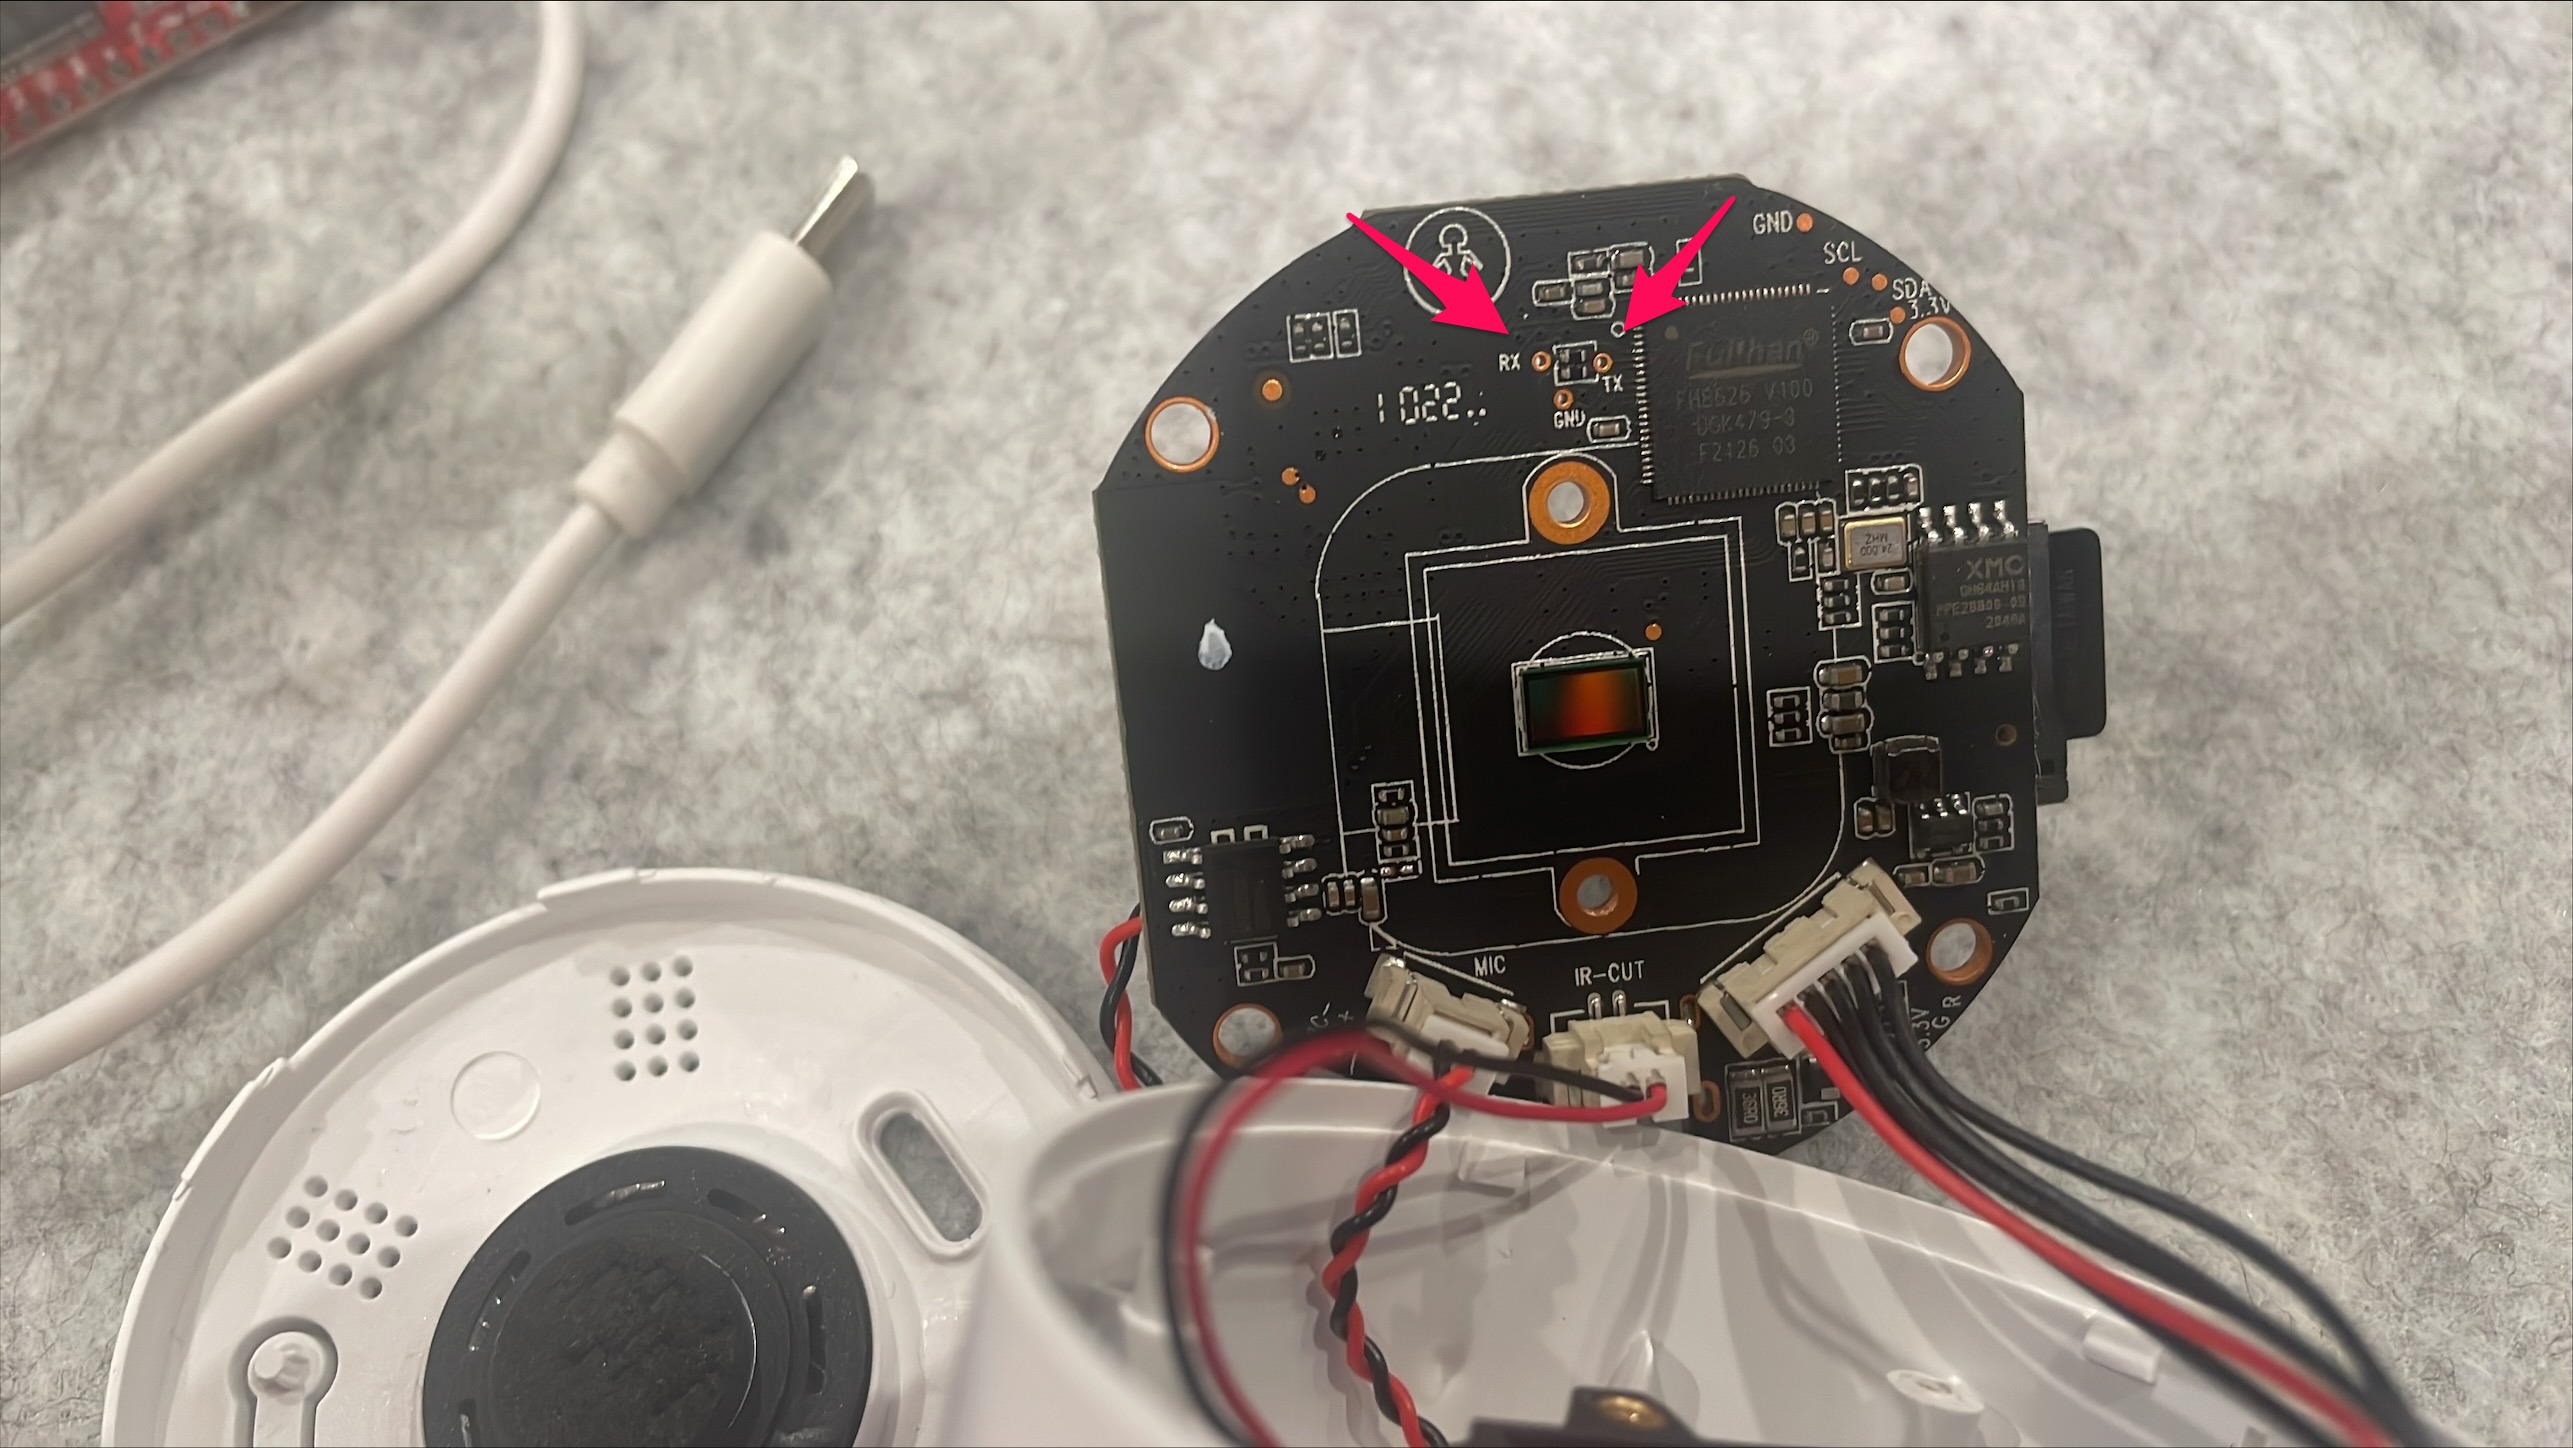
Functional serial ports of the LSC 1080
If you are having trouble connecting to your device: Try troubleshooting it with sudo lshw. The RS232 should be shown as product: FT232R USB UART and after that, a quick demesg | grep tty can be used to find the device path. In our case, we could connect with screen /dev/ttyUSB0 115200.
After that, we monitored the device behavior via the dev port connection. To our big surprise, we discovered the SSID and password during the boot process as plain text.
| |
The SSID and password can be seen here:
| |
An unauthorized person could grep the device and read out the WPA2 password without having to perform a timely Wifi-based attack.
Unauthenticated RTSP Stream
After our initial port scan, we discovered the device had an open port on 8445, which is commonly used by the Real Time Streaming Protocol (RTSP). At this point, we refer to Wikipedia for a quick explanation.
The Real Time Streaming Protocol (RTSP) is an application-level network protocol designed for multiplexing and packetizing multimedia transport streams (such as interactive media, video and audio) over a suitable transport protocol. RTSP is used in entertainment and communications systems to control streaming media servers.
When we’d cross-checked the official RFC documentation, we discovered an interesting note in chapter 16 “Security Considerations” of the RFC2326.
Authentication: Servers SHOULD implement both basic and digest authentication. In environments requiring tighter security for the control messages, the RTSP control stream may be encrypted.
So as a minimum standard, the connection URL should look something like this:
| |
With this knowledge and a sip from our coffee cups, we were off to the races. Guess what, this “security consideration” wasn’t anything we needed to consider. By inserting the URL in the trusty VLC Player, we could get access to the live stream - no credentials asked.
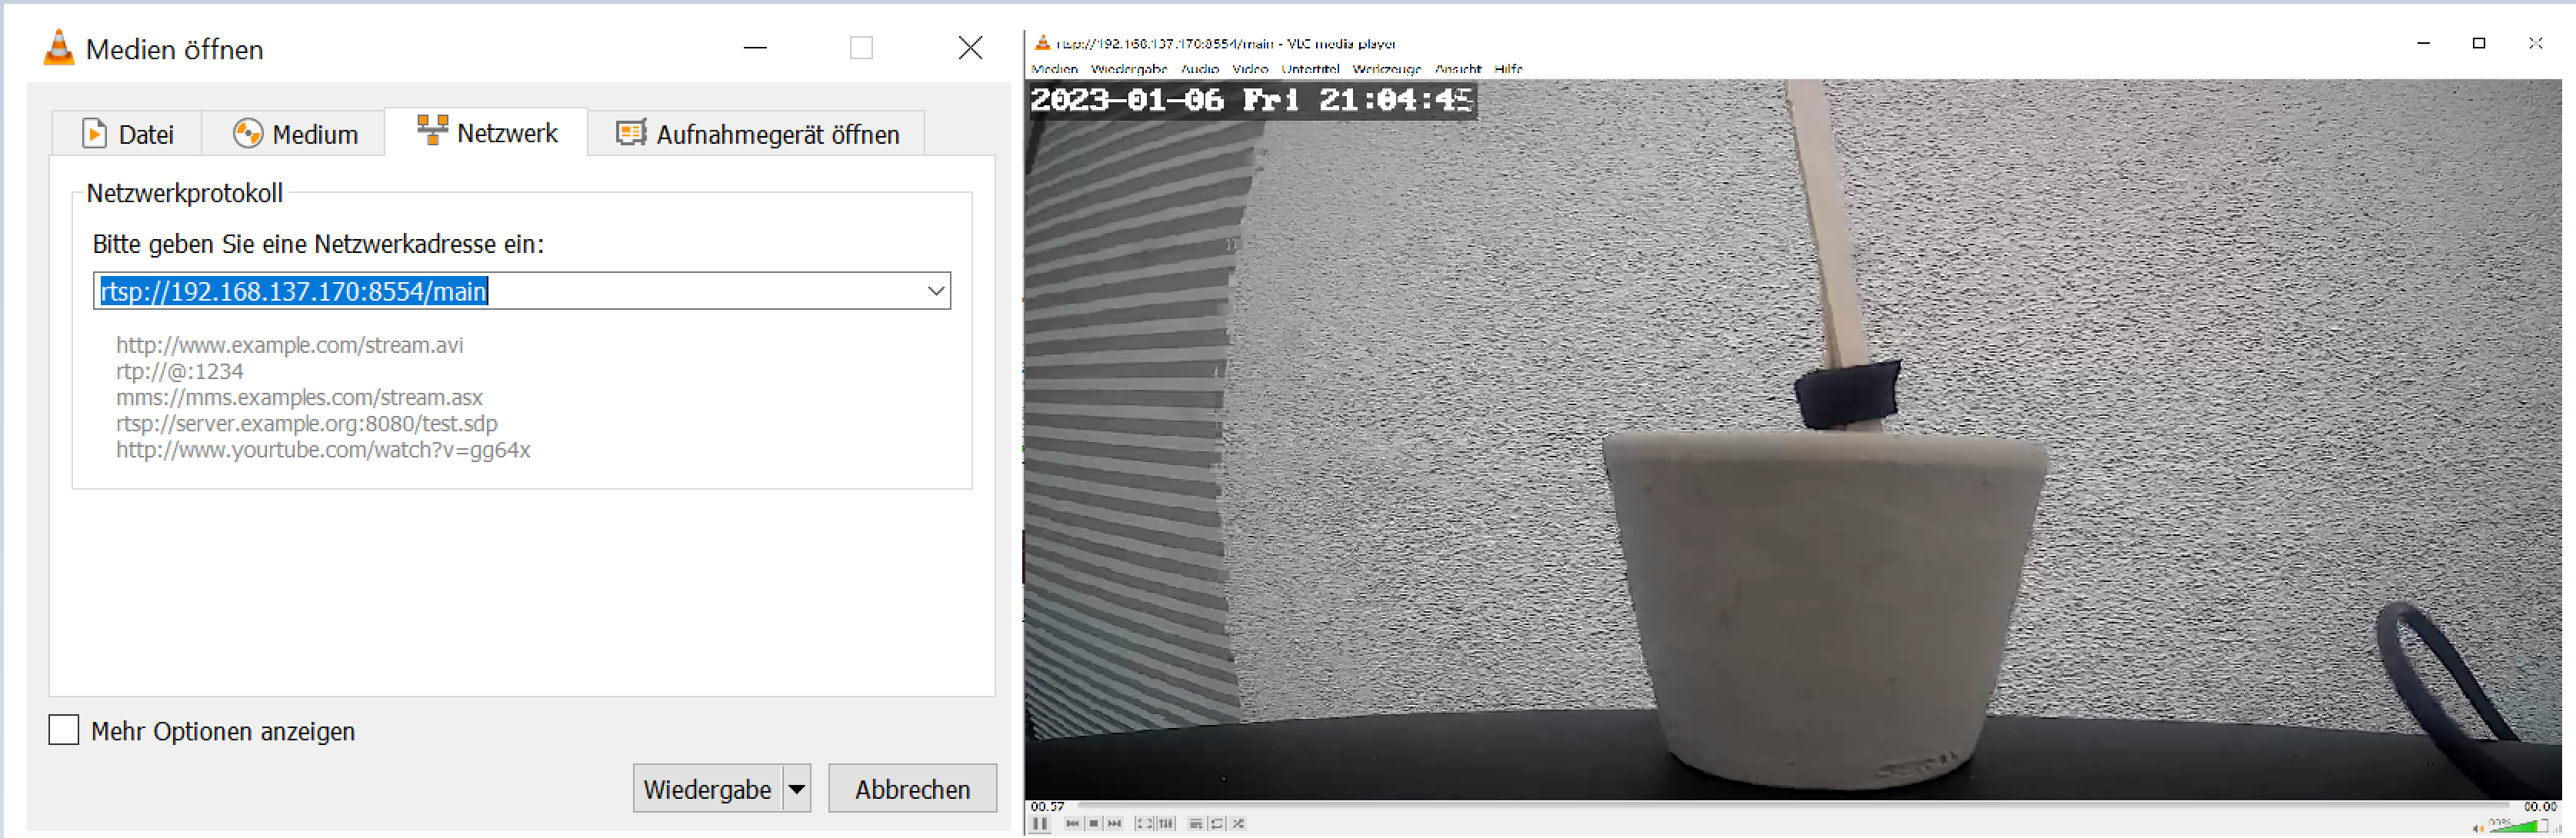
Configuring the RTSP stream in VLC and accessing the video stream
Plaintext Storage of Wifi credentials
When digging around the file system, we noticed that the current WIFI PSK is stored in plaintext in a file named wpa_supplicant.conf inside of the /tmp directory. It looks as follows:
| |
E.T. Wants To Call Home
Last but not least we tried to connect via the LSC App over a cellular connection, to see if possible from a public network would be possible. We soon discovered it worked. At this point, our discovery spirit was waked and we fired up Wireshark on the “router” (our Windows goat 🐐) and inspected the traffic.
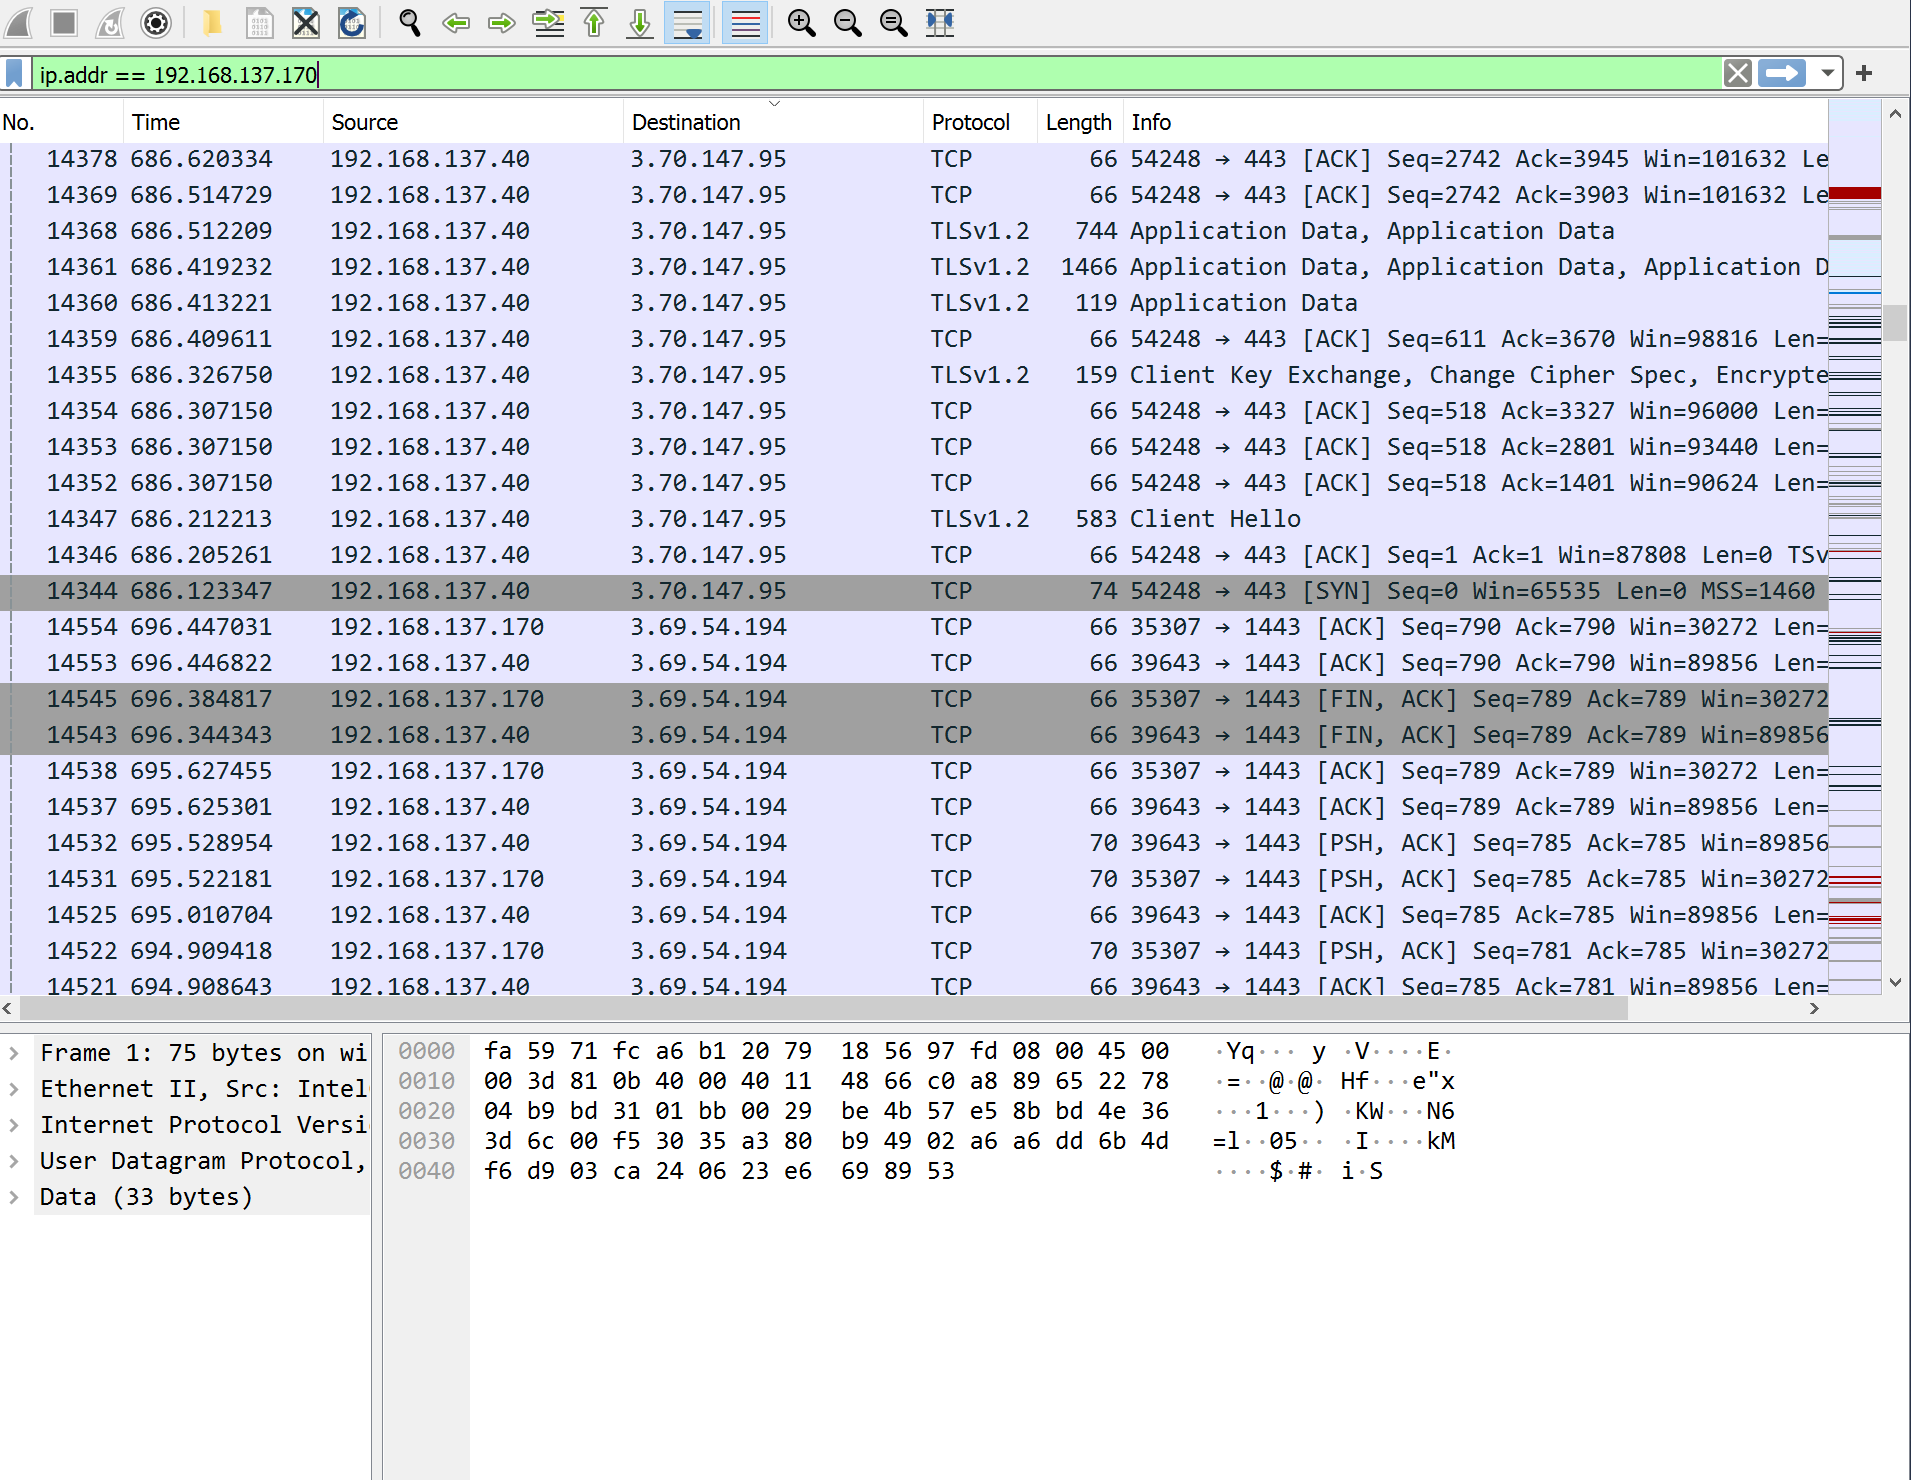
Connections as viewed in Wireshark
We found out the camera always wants to connect to the AWS Cloud and this can’t be disabled in the app. Of course, we ignore the existence of firewalls at this point for now. Through a quick whois we discovered the destination IP addresses belong to the AWS Cloud. On the positive side, the few IP addresses that we checked were all from the European Union.
Failed attempts
The above might sound bad, but we also have to give credit to Tuya where it’s due. Firstly, as explained above we were not able to log in as root via the serial connection or get root access directly through the network services.
Additionally, we tried to exploit the only user input the camera accepts: a QR code generated by the app during the registration of the camera. After decoding the code, we noticed that the app basically encodes the Wifi SSID, the Wifi password and an unknown identifier as a JSON dictionary (see below for an example). The data is then decoded by the camera and used to configure the WLAN interface using iwconfig.
This did not suffice to get code execution on the camera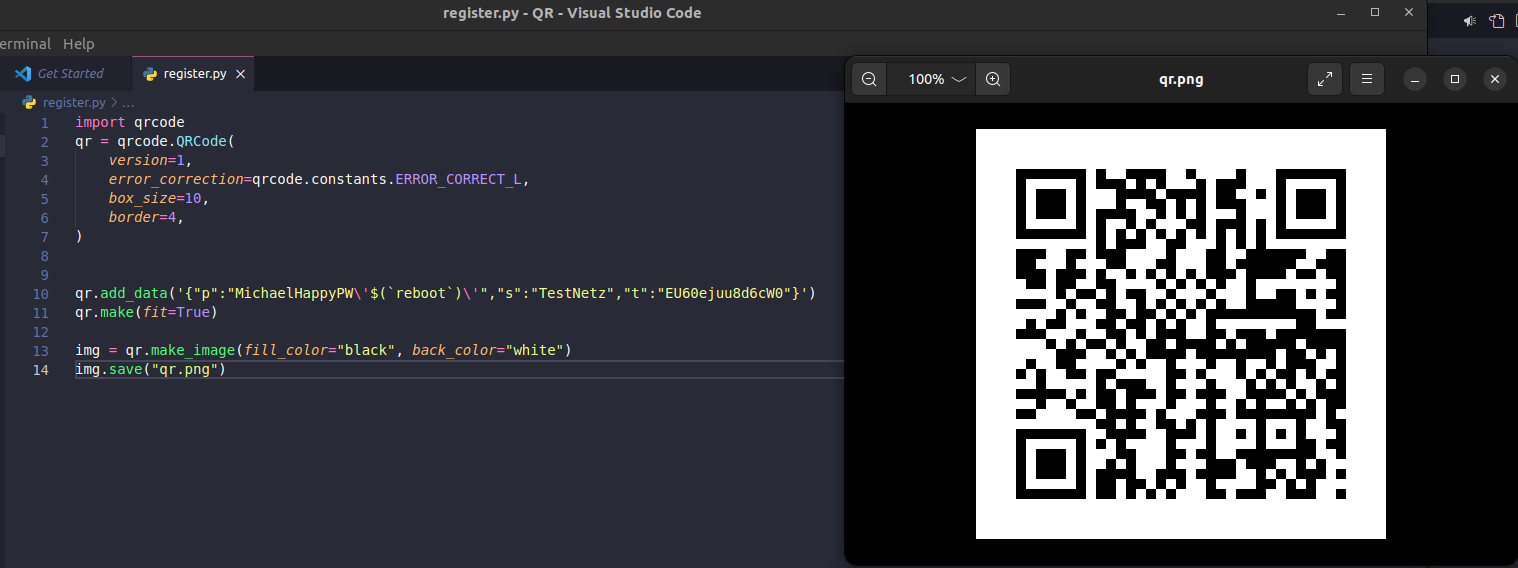
Even if our initial attempts to complete these tasks were not successful, the knowledge gained through the process will serve as an avenue for future research.
Summary
In this blog post, we explored the process of hacking the LSC 1080P camera sold by Action. We covered the tools and techniques that could be to gain unauthorized access and thoroughly enjoyed every bit. For us, this wee challenge proved to be a super interesting learning experience. In the future, we are planning to continue our disassembly efforts and intercept the boot process. Once we come around to doing that, we will update the post accordingly.
References
Mark Stanislav Dissertation https://github.com/mstanislav/phd-dissertation/blob/main/Camera%20Credentials.md ↩︎
GitHub Guino LSC1080P https://github.com/guino/LSC1080P/ ↩︎